#Formating external drive for mac and pc
Explore tagged Tumblr posts
Visit Tumblr Blog
Explore Tumblr blogs with no restrictions, modern design and the best experience.
Last Seen Tumblr Blogs


Fun Fact
25% of US internet users with an annual income of $80-100K use Tumblr.
Text
Downloading fanfic from AO3
I've been downloading a lot of fanfic lately for personal archival purposes, and I figured I'd share how I do it in case it's useful to anyone else (and so I have it written down in case I forget!).
There are lots of different ways to save fic, including the file download built into AO3, but I find that this gives me the nicest ebooks in the most efficient way.
(Under a cut cause long.)
Download Calibre: https://calibre-ebook.com/ or (clickable link).
Calibre is about the best ebook management and control program around and it's free. You can get it for windows, mac, and linux or download and run it from a portable storage device (I'm using a windows PC).
Install it and run it. It's gonna ask you where you want to put your library. Dealer's choice on this one. I recommend your internal drive (and then back up to external/cloud), but YMMV.
If you want to keep fanfic separate from the rest of your ebooks, you can create multiple libraries. I do, and my libraries are creatively named 'Books' and 'Fic'.
Customise Calibre
Now you're gonna install some plugins. Go to Preferences on the menu bar (far right), click its little side arrow, then choose 'Get plugins to enhance Calibre'.
At the top right of the box that pops up is 'Filter by name'. The plugins you want to get are:
EpubMerge
FanFicFare
Install them one at a time. It will ask you where you want them. I recommend 'the main bar' and 'the main bar when device is attached' (should be selected by default). When you're done, close and reopen Calibre.
The plugins you just installed should appear on the far right of the toolbar, but if you can't see one or both of them, fear not! Just click Preferences (the button, not the side arrow), then Toolbars and Menus (in the 'Interface' section) then choose the main toolbar from the drop down menu. That will let you add and remove things - I suggest getting rid of Donate, Connect Share, and News. That'll leave you room to add your new plugins to the menu bar.
(Do donate, though, if you can afford it. This is a hell of a program.)
Now you're ready to start saving your fave fanfic!
Saving fanfic
I'll go through both methods I use, but pick whatever makes you happy (and/or works best for what you're downloading).
ETA: if the fics are locked you can't easily use FanFicFare. Skip down to the next section. (It does ask for a username/password if you try and get a locked fic, but it's never worked for me - I had to edit the personal.ini in the configuration options, and even then it skips locked fics in a series.)
Calibre and FanFicFare
You can work from entirely within Calibre using the FanFicFare plugin. Just click its side arrow and pick from the menu. The three main options I use are download from URL, make anthology from a webpage, and update story/anthology.
Download from URL: pick Download from URL (or just click the FanFicFare button) and paste the fic's URL into the box (if you've copied it to your clipboard, it will be there automatically). You can do more than one fic at a time - just paste the URLs in one after the other (each on a new line). When you're done, make sure you have the output format you want and then go.
Make Anthology Epub From Web Page: if you want a whole series as a single ebook, pick Anthology Options, then Make Anthology Epub From Webpage. Paste the series URL into the box (if you've copied it to your clipboard, it will be there automatically), click okay when it displays the story URLs, check your output format and go.
Update series/anthology: if you downloaded an unfinished fic or series and the author updates, you can automatically add the update to your ebook. Just click on the ebook in Calibre, open the FanFicFare menu using its side arrow, and select either Update Existing FanFic Books or Anthology Options, Update Anthology epub. Okay the URLs and/or the output format, then go.
Any fic downloaded using FanFicFare will be given an automatically generated Calibre cover. You can change the cover and the metadata by right clicking on the title and picking edit metadata. You can do it individually, to change the cover or anything else specific to that ebook, or in bulk, which is great for adding a tag or series name to multiple fics. Make sure you generate a new cover if you change the metadata.
Browser plugins, Calibre, and EpubMerge
You can also use a browser addon/plugin to download from AO3. I use FicLab (Firefox/Chrome), but I believe there's others. FicLab: https://www.ficlab.com/ (clickable link).
FicLab puts a 'Save' button next to fic when you're looking at a list of fics, eg search results, series page, author's work list etc. Just click the 'Save' button, adjust the settings, and download the fic. You can also use it from within the fic by clicking the toolbar icon and running it.
FicLab is great if you're reading and come across a fic you want to save. It also generates a much nicer (IMO) cover than Calibre.
You can add the downloaded fic to Calibre (just drag and drop) or save it wherever. The advantage to dropping it into Calibre is that all your fic stays nicely organised, you can adjust the metadata, and you can easily combine fics.
Combining fics
You can combine multiple fics into an anthology using EpubMerge. This is great if you want a single ebook of an author's short fics, or their AUs, or their fics in a specific ship that aren't part of a series. (It only works on epubs, so if you've saved as some other format, you'll need to convert using Calibre's Convert books button.)
Select the ones you want to combine, click EpubMerge, adjust the order if necessary, and go.
The cover of the merged epubs will be the cover of the first fic in the merge list. You can add a new cover by editing the metadata and generating a new cover.
Combing with FanFicFare
You can also combine nonseries fics using FanFicFare's Make Anthology ePub from URLs option by pasting the individual fic URLs into the box.
Where there's more than a few fics, I find it easier to download them with FicLab and combine them with EpubMerge, and I prefer keeping both the combined and the individual versions of fic, but again YMMV.
Reconverting and Converting
Once I'm done fussing, I reconvert the ebook to the same format, to ensure everything is embedded in the file. Is this necessary? YMMV, but it's a quick and easy step that does zero harm.
If you don't want your final ebook to be an epub, just convert it to whatever format you like.
Disclaimers
Save fanfic for your own personal enjoyment/offline reading/safeguarding against the future. If it's not your fic, don't distribute it, or upload it to other sites, or otherwise be a dick. Especially if the author deletes it. Respect their wishes and their rights.
This may work on other fanfic sites, eg FFN, but I've never tried so I don't know.
If you download a fic, do leave the author a kudo or a comment; you'll make them so happy.
This is how I save fic. I'm not pretending it's the only way, or even the best way! This is just the way that works for me.
#fanfic#fic#ao3#ficlab#calibre#fanficfare#epubmerge#downloading fanfic#adding the my fic tag so I can find this again#my fic
1K notes
·
View notes
Note
Hello. 🥺I hope you can still remember me! 😂 would you mind provide me the specific tutorial on how to make these HQ gifs especially this post: https://www.tumblr.com/sinnersmovie/781373995991826432/the-pitt-2025-created-by-r-scott?source=share ? 🥺 the quality is really nice! I have the problem of gif making, the thing is that I have followed many tutorials on how to make HQ gifs but it always turn out differently even tho I follow every step.. I am too confused. Literally, so desperate to fix the problem 😭 not sure what did I do wrong..
yes, hi!!! so, for this gifset from the pitt, i can walk you through my process on capturing footage and coloring, but if what you're struggling with is quality, the most important part is the file and definition of the footage you're working with.
i personally almost exclusively use 1080p footage with a decent file size. a file can be HD and still vary in size from a couple hundred megabytes to several gigabytes. this will also depend on the length of the episodes (half-hour episodes vs. an hour-plus). since we're talking specifically about my gifs of the pitt, my DLs of the episodes are all in the 2-3.5gb range, give or take.
i know there are gifmakers that swear by 4k footage and i certainly won't deny that gifs made from 4k files are stunning, but i've already spent a lot of money on external hard drives and don't have the space to spare for the frankly massive sizes of 4k movies and tv. besides, most 1080p quality gifs turn out perfectly well!
below the cut, i'll show you how i capture, gif, and color scenes from the pitt like this:

note: this tutorial is beginner-oriented!
step 1a: once you obtain your file (this is not a piracy tutorial lmao, but if you google "piracy reddit" you can find a lot of reputable suggestions for sites to peruse), it's time to screencap or clip the scene(s) you want to gif. i would say that, from what i've seen, most gifmakers use screencaps, but i highly prefer taking short video clips (which i keep and usually label for future use/reference), so i'll be showing you that version. if you would prefer to screencap, please check the "beginner tutorials" tag on my resource blog @gifmakerresource
step 1b. i only use windows pcs, so i can't give any specialized info regarding macs, just as a disclaimer. i use the program VLC Media Player, both for clipping scenes and as my regular media player on both my laptop and my desktop. to initially set up vlc's recording capabilities, i used this website (please just ignore all their annoying advertising for movavi).
step 1c. now that vlc is set up to record footage played through it, i open my video clip (ctrl+o) and navigate to the scene i ultimately want to gif. i typically recommend recording an extra 5-10 seconds before and after the clip, especially if you need to convert the clip afterwards.
step 1d (optional). depending on the file format of your episode, you may need to convert the clips you take before photoshop will accept them. for example, a vast majority of the files i download are mkv files, but photoshop works best with mp4 files. for this, i use another program called HandBrake. once downloaded, i add whatever file(s) i need to convert, select the appropriate preset (which is almost always "Super HQ 1080p30 Surround" to maintain as much of the original quality as possible). you can select where the converted files automatically save for organization purposes, just like with vlc.
step 2. now that we have the clip we want to turn into a gif, it's time to bring it into photoshop. to do so, select file -> import video frames to layers. once you select your video clip, photoshop will pop up with a little media player with a few controls. here's what that looks like:

the box on the left that i've highlighted is what you'll adjust depending on whether you want to load in the entire clip or a specific range of the clip. with the way i clip scenes, i have quite literally NEVER used "from beginning to end." instead, i use the toggles on either side of the progress bar (circled in red) to select a specific range. you don't have to be overly precise with this as you can always delete extra frames, so i'll navigate using those little arrows until i roughly have the shot i want to turn into one gif and click okay. i would not recommend checking "limit to every x frames" because while this can help with file size, it will make your gif appear choppy. make sure "make frame animation" is checked.
this is what photoshop looks like after clicking OK:

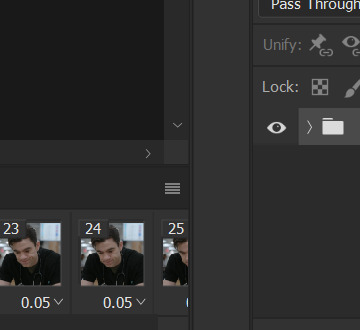
across the bottom are the frames. make sure that "forever" is selected at the bottom left rather than once or three times. this makes sure that wherever you post your gif, it will play continuously. the 0.04 below each frame is the frame rate -- at this setting, each frame plays for four tenths of a second. this might vary depending on your source material, but i HIGHLY recommend using 0.05-0.06. we're not going to worry about that yet, though, so don't bother changing it right now.
over on the right under "layers" are, you guessed it, each frame's corresponding layer. now, i could go more in-depth on this, but i don't gif using frame animation. i used to a very long time ago (over ten years ago), but i use a series of actions to convert to timeline animation. before doing that, however, i execute a couple more steps first.
step 3 (optional). i may be a slob irl, but i'm extremely organized and neat on my computers, so the first thing i do is use an action i created to select all the layers and put them into a group. to manually do this, you can either click on the first (or last) layer and then click on the last (or first) while holding down shift OR you can go to select -> all layers OR you can use the keyboard shortcut alt+ctrl+a. i just turned this process into an action to save time.
step 4 (optional). delete any excess frames. because i don't bother with being extremely precise with photoshop's media player, i usually have to trim off extra frames at the beginning and/or end of my gif. to delete frames, select the first frame and either hold down control and click each one or hold down shift and click the last one to select everything in between. once the frames you want to delete are selected, click the little trashcan below the frames (near the left side just before the horizontal scrollbar).
note: to watch your gif at any time, simply press the spacebar. press it again to pause.
step 5. while everyone's process is different, i prefer to crop my gif to its final proportions here. there's nothing wrong with doing it later, but sharpening and coloring can take longer at larger dimensions. the width of a single gif in a row on tumblr needs to be 540px. two gifs in a row are both 268px wide. three gifs in a row are 177px, thus making tumblr's gutters (the small transparent spaces separating gifs) 4px.
step 6. this is when i sharpen my gif and convert it to timeline animation. when it comes to sharpening, i think everyone probably does it a little differently. here's how i sharpen my gifs (which i turned into an action to save time) and here's the sharpening tutorials tag on my resource blog. as with most things gifmaking-related, i recommend trial and error. try different things until you find what you like! once again, to save time, i turned that sharpening tutorial (and its base sharpening) and the timeline conversion into a single action.
to convert your gif from frame animation to timeline, you need to select all your layers and all your frames and select "convert to video timeline" from the menu after clicking these three lines:
this is what i have once i've run my action to sharpen and convert:

you can adjust how zoomed in your timeline is with the slider at the bottom and if you're having issues with playback (though especially with larger/longer gifs, it always takes a while to load before playing smoothly) click the gear icon near the top of this screenshot and make sure it's set to 100% and to loop playback.

(group 2 is my vivid sharpening per the tutorial i linked, so if you don't use that, yours won't look exactly like this.)
step 7. time for my favorite part: coloring! now, i'd recommend taking a look at coloring tutorials as every show and every movie is going to be different. even separate scenes in the same episode can have totally different lighting. i have a bad good habit of saving just about every psd (photoshop file that contains all coloring adjustment layers), so there are times where i can just reuse a coloring i've already made rather than having to color each gifset from scratch, but you might be surprised just how much i DO color from scratch.
in several of my other gif tutorials, i explain and go step-by-step through my entire coloring process and why i use the adjustment layers i use, but as i said, what works for one scene may not work for another, so the best thing i can recommend is to familiarize yourself with commonly-utilized adjustment layers. play around with them, see what each one does, and over time, you'll be able to recognize which ones to use and when to use them. the adjustment layers i use are brightness/contrast, curves, selective color, channel mixer, gradient map, vibrance, hue/saturation, photo filter, levels, and exposure. the bolded ones are the ones i use on almost every single coloring.
on the navigation page on my resource blog, you can find a lot of tutorials that are specific to one or more types of adjustment layers and i encourage you to check those out as well as explore the navigation page itself.
here's an overview of my coloring for the pitt:

and here's a visualization for you of what each layer does:


(top to bottom, left to right) no coloring, brightness/contrast, adding curves, adding selective color 1 (black, neutrals, and white), adding selective color 2 (blue and cyan), adding gradient map (b&w set to 25%), fully colored, without vivid sharpening, and a comparison of the original to the full-coloring.
step 8. it's time to save! i HIGHLY recommend using this save action from @anyataylorjoy as it's a total lifesaver. if you save your gif right from here, photoshop will automatically set your frame rate to 0.07. while i used to gif at 0.07, i cannot believe how slow and choppy that looks now. all of my gifs are now 0.05, which is what this action does in part. without this action, you'd have to save your gif here and then open that file, change your frame rate, and re-save.
once this action has finished running, you go to file -> export -> save for web (legacy). here are my save settings, which do make a difference:

just remember, to be uploaded to tumblr, a single gif must be below 10mb in size. # of frames, #of colors, and dimensions all play a big part in the size of your gif. here's the finished gif at 540px:

to sum up, what's most important when trying to make high-quality gifs is the quality of your footage. generally, the larger the file size the better, but you do not have to use 4k instead of 1080p. and a 3gb 1080p file will likely look higher quality than a 300mb 1080p file. sharpening and coloring go into it, yes, but they're probably not going to make or break your gif.
as always, if you have additional questions or need clarification on any part of this tutorial, please let me know! i don't believe in gatekeeping and will always help to the best of my ability (it just might take me a few days).
26 notes
·
View notes
Text
my pc is almost completely ready to go!! installed windows today w/ all the drivers needed for my gay little pc parts and got the last of the files on the mac ready to transfer. last thing i need to do is reformat the external hard drive i keep literally everything on to exFAT (though i swear that’s what i formatted it to when i first got it but whatever)
#just gotta make a backup of my entire drive to my mac with a slow write speed….haha#going from 8gb ram to 32gb feels tremendous though. like damn i really lived like that when i coulda had better#the optical drive arrives later today i’m very excited 4 it#txt
11 notes
·
View notes
Text
ok i haven't been super active lately because icymi my macbook got absolutely fried and i got a pc as a replacement which i love. but my external hard drive with all my giffing stuff was formatted for a mac so my pc can't recognize it and it's honestly made me really sad.
BUT today i found my husband's ancient macbook which hasn't even been turned on in...at least a year?? but i got it to turn on and am currently copying over all my giffing stuff starting with OUAT
so long story short, i'll be back soon :)
10 notes
·
View notes
Text
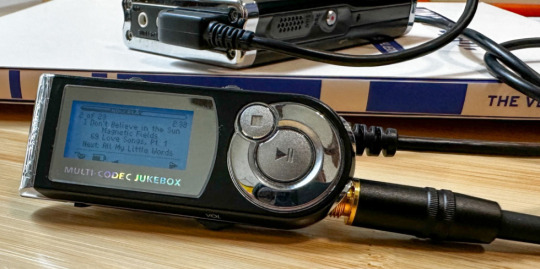
An ode to the iRiver iHP-120
For whatever reason, I've found myself deeply nostalgic for high school as of late. And for me, that is intractable from nostalgia for what is perhaps the peak mp3 player ever made:
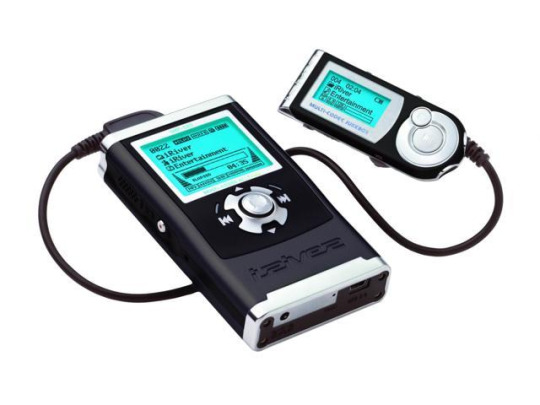
The iRiver iHP-120 was released in 2003, my sophomore year of high school, and it changed my life. This thing held an astounding 10GB of music—for comparison, most mp3 players at the time were flash based, and held 128 or 256 MB of music. The only big competitor at the time was the 1st generation iPod, a mac-exclusive device that transferred data over firewire and had to be synced using the fledgling iTunes. Juxtapose that to iRiver, who took what I like to call the "we don't give a fuck" approach:
When you plugged in the iHP-120 with USB 2.0, it just showed up as an external hard drive—you could throw whatever you wanted on there. Naturally, it could read mp3 files, but this thing introduced me to the world of audio codecs and processing in a way nothing could have prepared me. WMA files worked fine (a big deal at the time because of DRM issues, during the heyday of KaZaA and Limewire). You want to play uncompressed .WAV files? No problem, put them on there. FLAC files? Absolutely, let your audiophile freak flag fly. Fucking OGG Vorbis files played on this thing. Hell, you could put text files on here and read them.
(The firmware for these was also basically open-source, and people did even crazier stuff with them. By the time I retired my player, it could do gapless playback, crossfading, 10-band equalizing, normalization and more. I think I also changed the boot screen to a picture of Sailor Moon.)
But the magic didn't end at uploading music to the iHP-120—controlling this thing was more intuitive than any other device around at the time. All of your music was displayed on the player in whatever folder structure you loaded onto the device—navigating the music was as simple as using Windows Explorer. You had your standard play/pause, skip forward/back and volume controls on the front joystick, but what are the other buttons for?
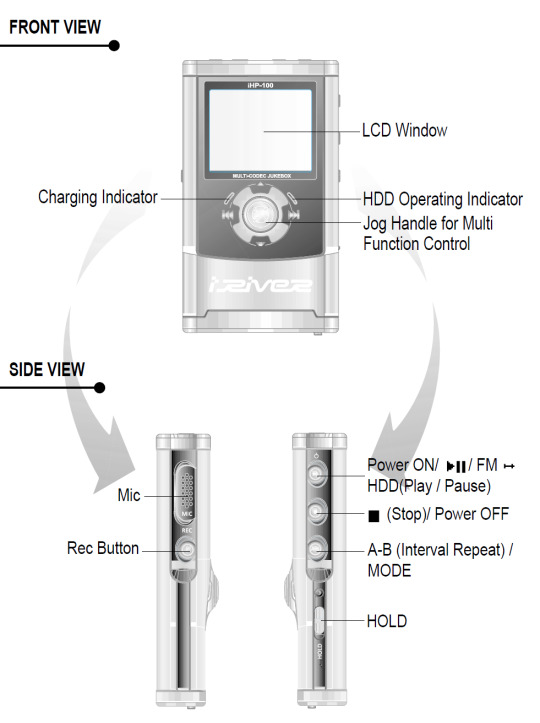
Yeah. This thing was also a portable recorder. At anytime you could just hold down the Rec button and start recording with the onboard mic, or using an external input (more on that later). On the right side, an A-B Interval control. You ever wanted to just listen to one part of a song on repeat to learn the lyrics? Just hold down the button. Lastly a hold switch to disable control inputs while it was in your pocket—no accidentally pausing the music.
Okay, back to the external input mentioned before. The top of the iHP-120 is wild.
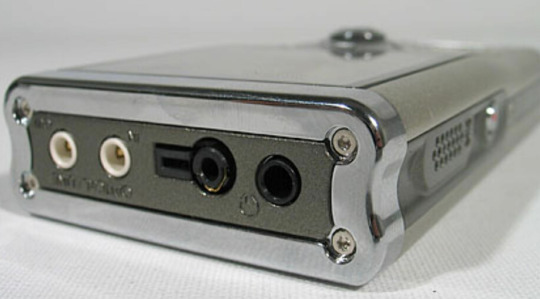
The top I/O panel of the iRiver iHP-120, with 4 jacks.
From right to left, you have a 3.5mm headphone jack (naturally), a 2.5mm microphone jack, the remote control port (more on this in a bit), and in white you have Line In/Out jacks which you could use to record as well as just plug in a second pair of headphones for a friend—jacks which support both 3.5mm analog input, as well as 3.5mm TOSLINK optical cables.

The TOSLINK 3.5mm male plug. A plug I only ever encountered on this device and the Sound Blaster X-Fi Titanium, a sound card I wrote a review of in 2009 which seems to still be up at PC Gamer and reading it now I don't know how any of my writing was ever published, let alone in print.
Chances are good you've never encountered this, it's phenomenally uncommon, and TOSLINK as a whole largely died with the emergence of HDMI—but this fucking mp3 player could both record and transmit fiber optic audio in uncompressed stereo or lossy 7.1 surround sound. In high school, I would plug the iHP-120 into our home theatre and listened to Porcupine Tree's Stupid Dream on repeat (side tangent, I'm pretty sad 5.1 album recording never really caught on, but the Dolby Atmos music format is better in every way, and I'm grateful Apple is bringing it into the mainstream).
"Okay, so we have an music player/text reader/voice recorder with optical audio, and basically every codec under the sun, what else could you go on about Erika?"
-you, the person reading this
THE REMOTE
Let me take you back to 2003. I was a depressed theatre kid teenager who would listen to Rooney on repeat on my Koss UR40s while crying over a girl who wanted nothing to do with me.
The Koss UR40 Headphones I wore like a fashion accessory everyday.
The other thing I wore everyday besides those headphones? Baggy cargo pants (it was acceptable at the time, I swear). Inside the right cargo pocket was my iRiver iHP-120, and clipped to the velcro flap of that cargo pocket was the iHP-115R remote control.
The iHP-120 remote unit
Every function of the iHP-120 could be controlled from this little fucker. Play/pause and stop buttons. Volume, skip track and recording are all here on rocker switches. You could even change the fucking bitrate of playback on this little thing, all without taking the actual mp3 player out of your pocket because the LCD screen on the remote has all the same info you'd get on the main unit.
The remote itself connected to the iRiver with that big plug you can see in the picture above (shamelessly stolen from Nathan Edwards who I worked with at PC Gamer in the late 2000s and only while writing this post discovered has already written a much more professional ode to the beauty of the iHP-120 this year).
You would plug your headphones into the remote, (or in my case you could also plug in your 1988 Chevrolet 2500 suburban's tape deck adaptor and have controls at your fingertips. No more distracted driving).
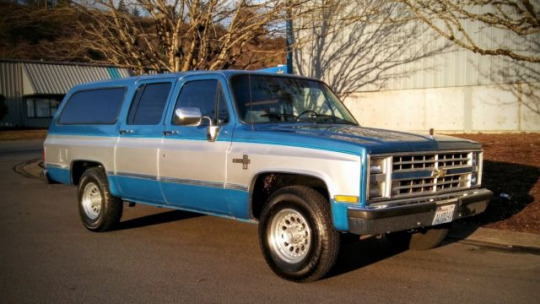
An image of a 1988 Chevorlet 2500 diesel Suburban. Not super relevant but god I miss my high school suburban. We would take the rear and middle benches out and put a queen-size mattress in the back, which 9 of my friends would ride on as we went to Little Caesar's for lunch. Also, cars just looked way fucking better back then.
I think I'm about done waxing nostalgic, but I really do miss the days of discrete devices—I kind of find myself fighting back against my smartphone. I have a camera I carry around, a pen and paper planner and writing notebook, and a kindle for reading. There's something appealing about not having my phone be my access to music either—rather, having a device that I just threw my music on and it plays it really well was rad. The iHP-120 was really fucking rad.
12 notes
·
View notes
Text
Download Ableton Live 11.3.21 Suite
Are you ready to elevate your music production to the next level? Look no further than Ableton Live 11.3.21 Suite, the industry-leading software trusted by professionals worldwide. With its cutting-edge features and intuitive interface, this latest version is a game-changer for musicians, producers, and DJs alike.
Unparalleled Performance and Compatibility
Powered by Apple Silicon and Intel processors, Ableton Live 11.3.21 Suite offers seamless performance on both Mac and PC platforms. Whether you're using the latest macOS or Windows 10/11, rest assured that this software will deliver optimal results. Say goodbye to compatibility issues and experience smooth operation with every session.
Lifetime Activation and Access
When you invest in Ableton Live 11.3.21 Suite, you're not just getting a piece of software – you're gaining access to a world of endless possibilities. Enjoy lifetime activation and unrestricted downloading privileges, ensuring that you can always access the latest updates and features. With Ableton's commitment to innovation, you'll never be left behind.
Feature-Rich Functionality
Discover a wealth of tools and capabilities designed to fuel your creativity. From powerful MIDI sequencing to flexible audio recording and editing, Ableton Live 11.3.21 Suite has everything you need to bring your musical ideas to life. Experiment with virtual instruments, effects, and sound libraries to craft your signature sound with ease.
Effortless Installation and Setup
Gone are the days of lengthy installation processes. With Ableton Live 11.3.21 Suite, you can enjoy instant download and hassle-free installation. Simply follow the straightforward instructions, and you'll be up and running in no time. Whether you're a seasoned pro or a newcomer to music production, getting started has never been easier.
System Requirements
Mac: Compatible with macOS 11 and all new versions.
PC: Compatible with Windows 10 and 11.
Processor: Apple Silicon or Intel processor.
Storage: 5GB hard disk or external drive.
Plugin Formats: VST2, VST3, AU, and standalone host.
Download Now and Elevate Your Music Production
Ready to take your music production to new heights? Don't miss out on the opportunity to download Ableton Live 11.3.21 Suite from saleonplugins.com. With its unmatched performance, lifetime activation, and feature-rich functionality, this software is a must-have for any serious musician or producer. Transform your musical vision into reality and experience the power of Ableton Live today!
#AbletonLive11#MusicProduction#AudioSoftware#DigitalAudioWorkstation#MusicSoftware#CreativeTools#MusicProducers#SoundDesign#AbletonSuite#MusicTech
2 notes
·
View notes
Text
Price: [price_with_discount] (as of [price_update_date] - Details) [ad_1] EXTERNAL STORAGE DRIVE: With our Portable Hard drive you can enjoy movies, music, and images on the go. Our Portable External HDD gives space to your computer instantly and takes large files with you. · SYSTEM COMPATIBILITY / HIGH-SPEED DATA TRANSFERS: 2.5" HDD External Hard Drive supports Windows / Mac / Linux / Android. SOur Portable hard drive can be connected with multiple devices like PC, Laptop, MAC, Smart Tv(make sure your tv supports USB port), Tablet. It improves performance by transferring data at lightning speed. · SUPPORT DATA/MULTIMEDIA STORAGE/BACK-UP: Now enjoy the freedom of carrying official data, Student's project work, and you can back up your data anywhere. Backup drive for pc can store multimedia files like AVI, MOV, FLV, MP4, MPEG, Music files like MP3, WAV, CAF, AIFF, images like JPG, JPEG, PNG, GIF, and many more. · PLUG AND PLAY: Backups are simple with the plug-and-play feature. No software is required to install. Plug and play function makes it easier to operate anywhere. Connect a USB 3.0 multimedia storage disc to your computer and drag and drop your files. This external hard disc is ready to use right away. For automated recognition, connect the portable harddisc to a computer. There is no need to install any software. · SATISFACTION 100% GUARANTEE / PACKAGE INCLUDES: We provide a One Year Warranty, and are proud of our high-quality products, and ensure that none of our customers have any issues with them. We are always here to assist you and address any problem. 1 X PORTABLE HARD DRIVE , 1 X USB CABLE Includes in this package Portable Hard Drive : Our external portable hard drive, improves PC mac laptop performance while allowing for quick data storage and backup. With our portable backup HDD, you can rapidly backup your important data, projects, photos, movies, videos, music, and other files and view them from your computer with a single click. Plug & Play Hard Disk : Just plug it in, and the external HDD is ready to use without the requirement of software installation. This external portable hard drive is designed for simple, space-saving operations. Data Transfer & Compatibility : External hard drive for Mac, Chromebook Laptop, macbook, desktop computer, Windows – You can used as a backup drive for data, video, files, and photo. Our external disk or harddrives have a 3.0 USB cable and provide fast data transfer speed up to 6 Gbps. You can keep your precious data with you all the time and enjoy your memories on any device. Slim and Compact Design: Our external drive is Merely 0.4 inch thick, outer cover is made with ABS plastic, keeping this portable external usb drive running fast and quiet. With a thin and compact size, it pops into your pocket. Note: If you encounter compatibility issues with the factory formatted file system on your hard disk, consider reformatting it following the steps in the image. This ensures better alignment with your computer's operating system, allowing for smoother functionality. What's Included: 1 X Portable Hard Drive, 1 x Pouch, 1 x USB 3.0 Cable, 1 x User Manual. [ad_2]
0 notes
Text
What services does Mantu Computech offer?

Welcome to Mantu Computech! Whether you’re a tech-savvy individual, a small business owner, or part of a large enterprise, we’ve got your back. Our mission is to simplify technology for everyone by offering a comprehensive suite of services tailored to meet your needs. Let’s dive into the full range of solutions we provide to keep your digital life running smoothly.
1. Computer Repair & Maintenance
Is your computer acting up? We’ll fix it!
Hardware Repairs: Broken screens, faulty keyboards, overheating issues, and more.
Software Troubleshooting: Virus/malware removal, OS errors, slow performance, and driver updates.
Upgrades: Boost speed with RAM, SSD, or graphics card upgrades.
On-Site or In-Store: Choose what works best for you. Perfect for: Laptops, desktops, Macs, and gaming PCs.
2. Professional IT Support
Keep your business tech stress-free with our IT expertise.
24/7 Remote Support: Instant help for emergencies.
Network Setup & Security: Secure Wi-Fi, VPNs, firewalls, and data encryption.
Cloud Solutions: Backup, storage, and migration services.
Cybersecurity Audits: Protect your business from threats. Ideal for: Small to medium businesses, remote/hybrid teams.
3. Software Development
Transform your ideas into powerful tools.
Custom Software: Build CRM, ERP, or inventory management systems.
Mobile Apps: iOS and Android apps for startups or enterprises.
AI & Automation: Integrate smart solutions into workflows.
Legacy Software Modernization: Update outdated systems. Tailored for: Healthcare, education, retail, and more.
4. Web Design & Development
Create a stunning online presence that converts.
Responsive Websites: From blogs to e-commerce stores.
SEO Optimization: Rank higher on Google.
Platform Expertise: WordPress, Shopify, Wix, and custom coding.
Maintenance: Regular updates, security patches, and bug fixes. Great for: Startups, bloggers, and online businesses.
5. Data Recovery Services
Lost files? Don’t panic—we can recover them!
Hard Drive Recovery: From crashed, formatted, or water-damaged devices.
SSD/Flash Drive Recovery: Retrieve photos, documents, and videos.
Confidentiality Guaranteed: Your data stays private. We handle: Laptops, servers, external drives, and RAID systems.
6. Network Maintenance
Keep your business connected and secure.
Proactive Monitoring: Prevent downtime with 24/7 oversight.
Speed Optimization: Fix slow networks and latency issues.
Maintenance Contracts: Scheduled checkups for peak performance. Best for: Offices, schools, and co-working spaces.
7. Custom-Built Computers
Get a PC designed just for you.
Gaming Rigs: High-FPS machines with RGB lighting.
Workstations: Powerful setups for video editing, coding, or 3D modeling.
Budget-Friendly Options: Quality builds without breaking the bank.
Warranty Included: Peace of mind with every purchase.
8. Computer Components & Accessories
Upgrade or replace your gear with ease.
Components: GPUs, motherboards, processors, and cooling systems.
Peripherals: Keyboards, mice, monitors, and ergonomic chairs.
Eco-Friendly Options: Sustainable tech for eco-conscious users. Shop online or in-store!
9. Software Licenses & Training
Stay legal and skilled with our resources.
Licenses: Genuine Microsoft, Adobe, and antivirus software.
Training Programs: Learn coding, cybersecurity, or Microsoft 365.
Corporate Workshops: Upskill your team with tailored sessions. Certifications provided upon completion.
Why Choose Mantu Computech?
✅ Expertise: Certified technicians and developers. ✅ Customer-Centric: Flexible pricing, warranties, and fast turnaround. ✅ Comprehensive Care: From hardware to cloud solutions—we do it all. ✅ Affordable: Competitive rates for individuals and businesses.
🚀 Let’s Get Started! Whether you need a quick repair, a custom app, or a secure network, Mantu Computech is your trusted partner. Contact us today for a free consultation, or visit our store to explore our products and services.
Your tech problems end here. 💻✨
1 note
·
View note
Text
Portable Outlook Mac Backups with Mail Backup X: Built to Move
Data that lives in one machine, tied to one setup, often becomes fragile. You may not notice this until something shifts, such as acquiring a new device, changing your workspace, traveling, or needing a repair. Outlook for Mac does its job well inside its own environment, but its data doesn’t travel easily. Mail Backup X shifts the balance by creating portable Outlook Mac backups independent of the client or the system.

You can take your archives with you, store them on multiple platforms, and open them independently of Outlook. This creates a working model where your information remains accessible wherever you are.
Setting Up an Outlook Mac Backup That Moves with You
So, first, let’s see how exactly you can do that with the help of “Mail Backup X.”
Begin by opening Mail Backup X and clicking on “My Backup Profiles.” Select “Add New Backup” to begin.
Choose Outlook Mac and then the tool will locate and link to the local database without needing a manual path.
Pick the folders you want to back up.
Give the backup profile a name that reflects its purpose or contents.
Select a storage location. This might be your Mac’s internal drive, an external USB drive, or a connected cloud account. All options create the same .mbs format.
Since portability is the goal, use cloud or external drives as your primary or mirror location. You can add one or more mirrors by clicking the “Add Mirror” button and selecting additional destinations.
Set the schedule. Automatic backups can detect new emails and act as needed. Recurring backups can run at fixed times, every hour, daily, weekly, based on your preference.
If you plug in a USB drive and register it, the tool can automatically copy your Outlook Mac backups to that drive each time it connects.
Click save. The first backup starts immediately. You can continue using Outlook Mac while it runs in the background.
Accessing Your Portable Outlook Mac backups
Once the backup of your Outlook Mac data exists, you can move it anywhere. If you open the software on another Mac or a Windows PC with Mail Backup X installed, you can import the archive using the “Open Archive” button. This creates a new profile in the viewer, where your emails appear exactly as they were backed up, folders intact, attachments preserved, timestamps in place.
You can search through the archive as though it were still part of your live email. The search bar handles both basic queries and complex expressions. This makes it easy to locate a specific piece of information, even inside a large, multi-year archive.
Exporting to Other Formats Without Losing Portability
Let’s say you’re no longer using Outlook or need to switch to a different client. The export feature allows you to convert your Outlook Mac backed up data into formats compatible with the most popular email platforms. You can export an entire folder to PST for Microsoft Outlook or choose EML files for clients like Thunderbird or Apple Mail.
If you want to create a fixed record for documentation, legal, or archival purposes, exporting to PDF offers a practical option.
Each export happens within the viewer itself. Select the folders or messages you want, choose the format, and designate an output location. The software handles the conversion, keeps the structure intact, and reports progress in real time.
How Portable Are Mail Backup X Archives?
Q: What format does the tool use for Outlook Mac backups?
On macOS, each backup profile creates a compressed archive saved as an .mbs package. This archive contains your backed-up Outlook Mac data and can include all folder structures, metadata, and attachments. Unlike standard exports from Outlook, this format is recognized by the tool on any supported machine. That means you can copy it to another system, open it using the app there, and continue working with it just as before.
Q: How can you access the contents of an archive on a new computer?
You launch Mail Backup X on the new system, click “Open Archive,” and select the .mbs file. The app then reindexes the archive, rebuilding the folder view and search-index, so everything appears as it did on the original machine. There is no need to restore anything to Outlook or import it into another mail client. The archive opens as a viewable and searchable profile within the app. Note, seeing the contents of backed up package can also be done through the free version of the tool.
Q: What makes this system more flexible than native Outlook export options?
Outlook’s own export tools produce files like .olm, which are not readable outside the client itself. Mail Backup X archives are readable without Outlook, searchable through the built-in viewer, and transferable between Mac and Windows. If you use different devices at home and at work, or if your machine changes, you won’t lose access to your mail.
Q: Can the tool export Outlook Mac backed up data to standard formats for use elsewhere?
Yes. You can export individual messages or entire folders or the entire profiles into formats like PST, EML, MBOX, and PDF. This means you can migrate your email data into a different client or share selected parts without sending the whole backup. The export function doesn’t require you to unzip or decode the archive manually. Everything happens from within the interface, with folder selection, target format, and destination handled in a few steps.
The Value of Data That Travels Well
There’s freedom in knowing your data is not locked to one interface, one operating system, or one machine. For people who work across platforms, this means fewer technical blocks and smoother handoffs. If you’re handing over a project to someone else, switching devices, or simply archiving years of communication, you want that archive to open and function wherever needed.
Mail Backup X does not build walled gardens. It gives you a way to create Outlook Mac backups that are light to carry and easy to read. From compressed .mbs files to cloud mirrors, from USB snapshots to export tools, everything is shaped with mobility in mind.
A free trial version is available for you to explore these features and see how portable your Outlook Mac email backups can become. The process starts simply but opens into a much larger system of access and control. Once you see your archive appear, complete, structured, and untied from your machine, you begin to understand what portability really looks like.
You don’t start over each time the device changes, or the setup evolves. With Mail Backup X, the Outlook Mac backup remains intact, readable, and ready, wherever your work moves next. What stays with you, in the end, is access without interruption.
0 notes
Text
Hard Drive Data Recovery Services Company

We additionally perceive how vital it is that your information is recovered as rapidly as possible after a experiencing a failure or crash. The capacity to get well deleted files from an external exhausting drive could be extremely essential in a selection of conditions. If a tough disk is inaccessible, we first check the components and intently study drive platters to determine the extent of physical harm - Hard Disk Data Recovery.
When Windows is installed hard drive gets formatted, Files get, corrupted due to virus attacks, Partitions structure gets deleted or damaged, Unexpected system shutdown or software failure Windows registry gets corrupted, Our expert data recovery experts can recover the lost data from any version of Windows with and EFS file system. Our goal is not only to provide high-quality products but also to provide comfortable customer service. To this end, we cherish every users comments on products, websites, and services - SSD Data Recovery.
We know that when your pc, PC or laptop fails, you need quick and easy computer repairs from one of the best restore services in India at an inexpensive worth. When you need a pc restore service, you need one that may do it shortly and correctly. There are many data recovery programs out there on the internet that can save your important data from being entirely erased from your hard disk should problems with it persist. However, not all can really be saved. It will depend on how big the damage is done on your hard disk drive. To get more information on how such important computer solutions are used and learn their limitations.
Recover lost data from a desktop PC, laptop, Mac or Windows hard drive. We help to recover data loss due to hardware failures, physical damage, and malware etc. You no need to worry we can save it. We utilize simplified processes that can assist you in recovering any lost records data in your system. Losing your useful info stored in your storage gadget is a superb disappointment and to keep your data safe. We assume no legal responsibility for damage to the client’s information and/or property while performing data restoration procedures or during cargo or for uninsured shipments. We are very pleased with our prime quality, honest and reliable service which far exceeds that of our competition. For more information please visit our site https://www.nowdatarecovery.com/
0 notes
Text
Download Toontrack Complete Bundle 2023

If you're a music producer or enthusiast looking to elevate your audio production, the Toontrack Complete Bundle 2023 is an essential toolkit. This comprehensive bundle provides a plethora of virtual instruments, MIDI libraries, and effects, ensuring you have all the creative tools you need at your fingertips. Here's a detailed guide on how to download and install this incredible bundle from Sale on Plugins.
System Requirements
Before diving into the download process, ensure your system meets the following requirements:
Compatibility: The Toontrack Complete Bundle 2023 supports both Apple Silicon and Intel-based systems.
OS Requirements for Mac: Compatible with Mac OS 10.13 to all newer versions of macOS.
OS Requirements for PC: Requires Windows 8 or later.
Storage: You need at least 100GB of available hard disk space, which can be on an internal or external drive.
Supported Formats: Compatible with VST2, VST3, AU, and can be used as a standalone host.
Lifetime Activation and Future Updates
One of the standout features of the Toontrack Complete Bundle 2023 is its lifetime activation. Once you purchase and activate the bundle, you’ll have perpetual access to all its features and future updates. This ensures that your software remains up-to-date with the latest enhancements and new releases from Toontrack.
Steps to Download the Toontrack Complete Bundle 2023
Visit the Sale on Plugins Website: Navigate to the official product page by following this link.
Purchase the Bundle: Click on the “Add to Cart” button and proceed with the checkout process. Make sure to provide accurate information to avoid any issues during the activation process.
Instant Download: After completing the purchase, you will receive an instant download link. This allows you to start downloading the bundle immediately without any waiting time.
Download the Installer: Click on the provided link and download the installer package for your operating system (Mac or Windows).
Run the Installer: Once the download is complete, locate the installer file in your downloads folder and run it. Follow the on-screen instructions to complete the installation process.
Activate Your Bundle: After installation, open the Toontrack Complete Bundle application. You will be prompted to enter your activation code. This code is usually sent to your email upon purchase. Enter the code to activate your software.
Enjoy Lifetime Access: With the bundle activated, you now have lifetime access to all its features and future updates. Dive into the vast collection of instruments, effects, and MIDI libraries to enhance your music production.
Conclusion
Downloading and installing the Toontrack Complete Bundle 2023 from Sale on Plugins is a straightforward process that unlocks a world of creative possibilities. With comprehensive compatibility, lifetime activation, and continuous updates, this bundle is a valuable investment for any serious music producer. Follow the steps outlined above to seamlessly integrate this powerful toolkit into your workflow and start creating music like never before.
0 notes
Text
Checking Hard Disk Health in Disk Management
To ensure the optimal performance of your hard disk, it's crucial to regularly monitor its health. With the help of Disk Management, you can easily detect any potential issues or errors that might be affecting your disk. By checking the status of your disk in Disk Management, you can identify and resolve any disk-related problems with just a few clicks. This includes tasks such as changing drive letters, formatting partitions, or even updating firmware for external hard drives.
Keeping track of your disk's health is essential to prevent data loss or system crashes. Disk Management provides you with a convenient way to monitor the health of your hard disk and take necessary actions to maintain its efficiency. Whether you're using a PC, laptop, or Mac, Disk Management is a powerful tool that allows you to stay on top of your disk's performance. So, whenever you encounter disk-related issues, simply access Disk Management through the Start menu or by searching for it in Windows Explorer. With its user-friendly interface and comprehensive features, Disk Management is a valuable tool for maintaining the health of your hard disk.
hard disk repair
hard disk repair Malaysia
https://www.datarecoveryinmalaysia.com/hard-disk-repair-recovery.html
1 note
·
View note
Text
Formating external drive for mac and pc

#Formating external drive for mac and pc how to
#Formating external drive for mac and pc for mac
#Formating external drive for mac and pc mac os x
The NTFS file system is another option to use for Windows formatted drives and volumes, but it has limited compatibility with Mac OS by default.
#Formating external drive for mac and pc mac os x
If you require single files to be larger than 4GB, use exFAT instead, though you will lose some compatibility with older versions of Mac OS X and Windows. One of the limitations of using FAT32 is the file size limit, which limits files on the drive to being 4GB in size or less. This widespread compatibility makes FAT an ideal file system to use for external hard drives that are intended for use in environments with multiple operating systems. Once you have done with formatting, the drive will be compatible to be read and written to on both a Mac and PC, and the resulting FAT file system is compatible with all versions of Mac OS X, and Windows, including Windows 10, it’s one of the most widely recognized and usable file system formats. Hard drive can be formatted using both FAT32 and exFAT.
#Formating external drive for mac and pc for mac
Remo Recover for Mac is recommended here.” In the event of not having backups, then you can recover formatted external hard drive data using a reliable Mac Hard drive recovery software. Remember, formatting a drive erases all data contained on it so back up important files before proceeding. “Drives format very quickly, though the total time taken will depend on the size of the drive.
Click Options and choose Master Boot Record as the partition type, then click OK and Apply.
From the Partition Layout dropdown menu, select 1 Partition.
Click the drive, then select Partition tab.
When you want to use your drive with older versions of Windows, you may also need to set the partition scheme to Master Boot Record (MBR) for full Windows compatibility:
Give the drive a name(optional) and click the Erase button to format the drive.
Then click the pulldown menu alongside Format and select MS-DOS (FAT).
Click the drive name on the left side list in Disk Utility, and then click the Erase tab.
Attach the drive you wish to format for dual compatibility to the Mac.
And it is recommended to carry out the entire process on Mac OS X You can format any hard drive, flash drive, SSD, USB drive, that is accepted by both a Mac and Windows machine. How to Format a Drive for Mac and Windows PC Compatibility? In this article, we are going to introduce you with the entire process in few simple guidelines. It is just a matter of few minutes to do this. And if you are going to use Mac and Windows PC frequently, you will find this as very useful as any data, files, media files stored on the drive can be easily accessible from any operating system. Well, you can format the drive and make it as excellent cross-platform compatible to work with both Windows and Mac.
#Formating external drive for mac and pc how to
And they are incompatible with each other! Now, the question is how to make hard drive compatible with Mac and PCs? While Windows uses NTFS file system, Mac hard drives are formatted with HFS file system. The irony is that, by default, Windows and Mac use different file systems. Make your hard disk or USB flash drive compatible to both Mac and Windows PCs using this easy step by step guide.
0 notes
Text
Price: [price_with_discount] (as of [price_update_date] - Details) [ad_1] EXTERNAL STORAGE DRIVE: With our Portable Hard drive you can enjoy movies, music, and images on the go. Our Portable External HDD gives space to your computer instantly and takes large files with you. · SYSTEM COMPATIBILITY / HIGH-SPEED DATA TRANSFERS: 2.5" HDD External Hard Drive supports Windows / Mac / Linux / Android. SOur Portable hard drive can be connected with multiple devices like PC, Laptop, MAC, Smart Tv(make sure your tv supports USB port), Tablet. It improves performance by transferring data at lightning speed. · SUPPORT DATA/MULTIMEDIA STORAGE/BACK-UP: Now enjoy the freedom of carrying official data, Student's project work, and you can back up your data anywhere. Backup drive for pc can store multimedia files like AVI, MOV, FLV, MP4, MPEG, Music files like MP3, WAV, CAF, AIFF, images like JPG, JPEG, PNG, GIF, and many more. · PLUG AND PLAY: Backups are simple with the plug-and-play feature. No software is required to install. Plug and play function makes it easier to operate anywhere. Connect a USB 3.0 multimedia storage disc to your computer and drag and drop your files. This external hard disc is ready to use right away. For automated recognition, connect the portable harddisc to a computer. There is no need to install any software. · SATISFACTION 100% GUARANTEE / PACKAGE INCLUDES: We provide a One Year Warranty, and are proud of our high-quality products, and ensure that none of our customers have any issues with them. We are always here to assist you and address any problem. 1 X PORTABLE HARD DRIVE , 1 X USB CABLE Includes in this package Portable Hard Drive : Our external portable hard drive, improves PC mac laptop performance while allowing for quick data storage and backup. With our portable backup HDD, you can rapidly backup your important data, projects, photos, movies, videos, music, and other files and view them from your computer with a single click. Plug & Play Hard Disk : Just plug it in, and the external HDD is ready to use without the requirement of software installation. This external portable hard drive is designed for simple, space-saving operations. Data Transfer & Compatibility : External hard drive for Mac, Chromebook Laptop, macbook, desktop computer, Windows – You can used as a backup drive for data, video, files, and photo. Our external disk or harddrives have a 3.0 USB cable and provide fast data transfer speed up to 6 Gbps. You can keep your precious data with you all the time and enjoy your memories on any device. Slim and Compact Design: Our external drive is Merely 0.4 inch thick, outer cover is made with ABS plastic, keeping this portable external usb drive running fast and quiet. With a thin and compact size, it pops into your pocket. Note: If you encounter compatibility issues with the factory formatted file system on your hard disk, consider reformatting it following the steps in the image. This ensures better alignment with your computer's operating system, allowing for smoother functionality. What's Included: 1 X Portable Hard Drive, 1 x Pouch, 1 x USB 3.0 Cable, 1 x User Manual. [ad_2]
0 notes
Text
Format external drive for mac on pc

FORMAT EXTERNAL DRIVE FOR MAC ON PC HOW TO
FORMAT EXTERNAL DRIVE FOR MAC ON PC FOR MAC
FORMAT EXTERNAL DRIVE FOR MAC ON PC MAC OS
If you prefer to use this method, make sure that you follow the steps below carefully: Terminal command lines work the same as Disk Utility, however, it's more complex for beginners.
FORMAT EXTERNAL DRIVE FOR MAC ON PC FOR MAC
Format USB Drive for Mac using Terminal Command Wait for the process to complete and then you'll get a new Mac compatible file system on your external hard drive or USB, which will make your device detectable and workable on Mac. Step 6. Reset the drive name and click "Erase" to confirm the operation on the next pop-up window.
FORMAT EXTERNAL DRIVE FOR MAC ON PC MAC OS
Step 5. Select your USB or external drive, click "Erase", then click the Format column and select a format for your USB.įor example, Mac OS Extended (Journaled) or MS-DOS (FAT). Step 4. Double-click to open Disk Utility in the Utilities window to open it. Step 3. Double-click "Utilities" in the Applications window. On the Apple menu, click "Go" and select "Applications". Connect the USB or external hard drive to your Mac computer. You can try the following steps to format USB or external hard drive for Mac with Disk Utility on Mac: Format USB or External Hard Drive for Mac Using Mac Disk Utilityĭisk Utility offers users similar features in the disk management tool, such as to create, delete, resize, merge and format partitions.
If you want to format USB on your Windows computer and make it usable on Mac, try Method 3.
If you want to directly format the USB on your Mac computer, follow Method 1 and Method 2.
FORMAT EXTERNAL DRIVE FOR MAC ON PC HOW TO
So how do I format a USB stick on a Mac computer? Here, we'll show you how to format your USB flash drive or external hard drive for Mac usage. Format USB Drive for Mac on Mac/Windows Computers
If you tend to use it as a Time Machine backup disk, format it as Mac OS Extended Journaled.
If it's larger than 64GB, set its file system as exFAT.
If the USB drive is less than 64GB, set it as FAT32.
So how to set a suitable format for your USB flash drive or external USB drive? Here are our suggestions: Usually, both APFS and Mac OS Extended file systems are mostly used on Mac hard drives, while the FAT/FAT32 and exFAT are common formats for external storage devices.
FAT32 and ExFAT: Compatible with both Windows and macOS.
Mac OS Extended: Used by macOS 10.12 or earlier.
Apple File System - APFS: Used by macOS 10.13 or later.
Here is a list of macOS supported file systems: Note that Windows uses NTFS but Mac can't write files to volumes with NTFS format. Set a Suitable File System for USB or External USB Drive on Mac To prepare a USB flash drive ready for Mac on a Windows computer, you can try the third-party format software.Īfter picking the right USB format tool, you can now move to the next guide and decide which format that you should set for the USB flash drive or external hard drive. The terminal is far more complex for beginners. To format a USB flash drive on Mac, Disk Utility is better a better choice. So how to select a suitable tool to format your USB flash drive or external hard drive for Mac? For a quick guide, read the tips here:
0 notes
Photo
Finding high quality film/tv rips, saving the large files, and screencapping them are half the battle for gifmakers when setting out to make a gifset. Here’s a little guide on this process, including my advice on
Where to download stuff
Where to store your movies/shows
Screencapping programs
Making gifs as HQ as possible, including tips for picking out what to download when you have multiple options (not all 1080p rips of the same movie or tv episode are the same quality and I explain why)
Why screencaps of 4k movies can look weird and washed out and how to fix that
and more
✨ You can find my gifmaking 101 tutorial here and the rest of my tutorials here.
Where can I download movies and shows?
First off, I prefer direct downloading rather than torrenting stuff because it’s faster and with torrenting, there’s more of a risk. Other people downloading the same torrent can see your IP address. This means movie studios can find out you’re downloading their content and can send you a warning letter. The download speed also varies depending on how many other people are seeding it. I would only do it if it’s your only option and you have a VPN or something.
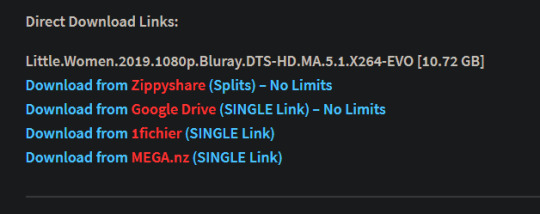
This is THE best guide for pirating I’ve ever seen. I use it for finding sites for books, music, you name it. The part of the guide you’d want to look at is where it says Direct Downloads Link (DDL) sites. My favorite place is Snahp. These ddl sites will have links to their movie/tv rips that are typically hosted on one of these two sites: google drive or mega.nz. You can download stuff from both of those sites for free, but with mega, they have a 5GB file download limit unless you have a premium account. I personally pay the $5 a month membership for mega because it’s worth it imo. You can buy a subscription through the mega app found on the iphone app store (so you’re billed through apple and it’s less scary than giving a random site your credit card info lmao) and as for androids I think mega has an app on there too.
So basically, if you go to http://snahp.it, they’ll have rips for different movies and shows.
You click on the movie title and it’ll take you to a page where they have links for the video which they have uploaded on a variety of sites (including mega).
How do I make my gifs as HQ as possible?
It’s best to gif things that are 1080p. And usually the higher the file size, the better. A really important thing to note is that not all 1080p bluray rips are the same. The piracy groups that rip these files take uncompressed .mkv rips from discs that are anywhere from 10gb to like 50gb, and then run that through video converters to compress the file down so that they’re 2-8gb. Sometimes when that happens, the video quality goes down a LOT. The same goes for TV episodes. One rip could be 800mb, the other could be 3gb and both could claim to be “1080p” but the quality would be NOTICEABLY different. Your best bet is to always pick the rip with the highest file size.
I’ll show you an example with this scene from You’ve Got Mail.

I downloaded 2 different 1080p rip versions of the film. Both claim to be 1080p, but one is 2.41 GB and the other is 9.75 GB. After taking screencaps, it’s obvious that there’s a BIG difference in quality.
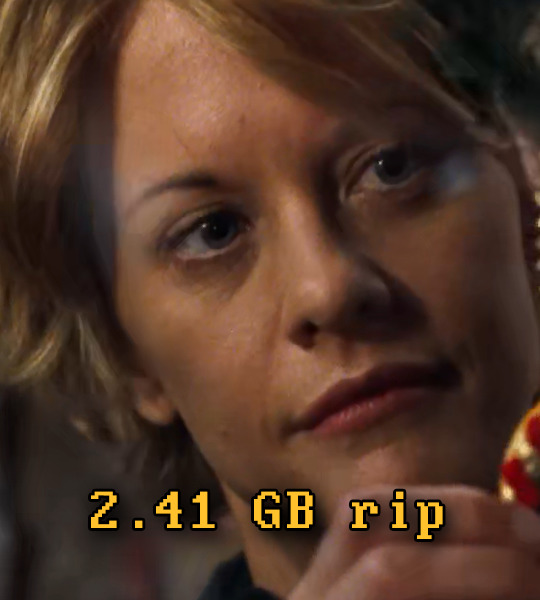
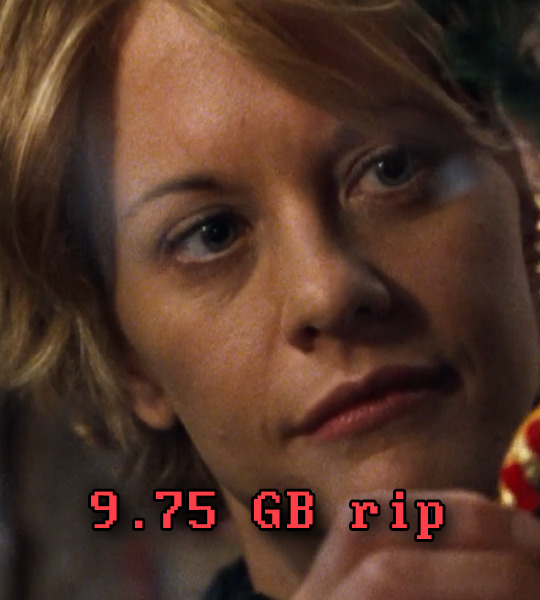
(these pictures are best viewed on desktop tumblr)
When it comes to Blu-ray rips, download remux versions of films and shows if possible. Remux means .mkv files that are uncompressed and straight from a Blu-Ray disc. Giffing remux rips cuts down on the possibility of seeing pixel-y effects a LOT in my experience. It’ll take a bit longer to download than typical 1080p rips but it’s worth it imo.
For TV episodes, if you can’t find a Blu-Ray rip, uploads with the word AMZN in it are usually the highest quality and your best bet (unless you see another upload that’s higher in file size - again: always try to pick the highest file size). 'AMZN’ means they’re from a person that ripped the episode from Amazon Prime Video.
Also, even better than 1080p is 4k (2160p). I only really recommend this though if you know you’re going to gif something up close and crop it a lot - like if it’s a big 540x540px close-up gif of a person. You’ll REALLY see the difference if it’s a 1080p vs 4k rip in that situation. I usually don’t bother with giffing 4k files unless it’s the case above because my laptop lags when taking 4k screencaps and it takes longer to load them into photoshop (4k screencaps are usually about 60mb each!)
⭐️ Another thing that’s important is making sure that when you actually make your gifs, you set them to the correct speed (.05 for movies and most shows, and .04 sometimes for reality tv and live broadcasts). Here’s my gif speed guide. Having the right gif speed is really important for making a gifset HQ. You don’t want it to look too slow or too fast.
What’s your favorite video player to take screenshots with?
MPV player, hands down. And I’ve tried a TON of programs over the years. I’ve tried KMPlayer and found that it added duplicate frames (and even missing frames) which is horrible, and I’ve tried GomPlayer which is.....I’m just gonna say it, I’m not the biggest fan of it. It’s a little overly complicated in my opinion and it has ads. If you like these programs, more power to you! Use whatever you’re comfortable using. I just like MPV the most because it doesn’t have ads, it’s simple, you can take sequential screencaps with a keyboard shortcut, and it can play 4k movies.
Screencaps I take of 4k 2160p movies look so dull and washed out, like the colors aren’t right. Why is that?
That’s because your computer can’t handle HDR 4k video files. It probably can handle SDR 4k video files, but unfortunately, 99% of 4k rips out there are HDR.

[picture source]
Now, HDR displays just fine on computers that have 4k-HDR capabilities, but most older computers don’t have this ability. Having said that, MPV - the video player I mentioned above can take a 4K-HDR video and fix the colors/lighting in real time so it displays correctly AND take screenshots of it with the fixed colors. If you have an older version of MPV, make sure you download the newest update for this. In my general gifmaking tutorial, there’s a portion on how to install this program on macs. I also just made a video tutorial on how to install it on pcs here!
High quality TV and Movie rips can take up a LOT of space on my computer. Where do you store your files?
I store them on external hard drives. External hard drives are like flash drives but they have a MUCH higher storage capacity. You just plug them into your computer via a usb cord when you need access to the files and it’s that easy. I have two of these Seagate 4TB hard drives in different colors so I can easily pick out whichever one I need. I have silver for my movies (because it makes me think of “silver screen” lmao and it’s easier for me to remember) and then I just have a blue for shows. Now, external hard drives of this size can be $$$$ but it’s worth it imo. Look out for when they’re on sale.
What’s the size limit for gifs now?
It’s 10mb! It used to be 3mb and then last year Tumblr upped it to 5mb. Some gifs initially had distortion because of Tumblr’s switch from the .gif to .gifv format, but they’ve fixed the problem AND increased the upload limit to 10mb. Just make sure not to add any lossy to a gif.
Lossy is basically a grain you can add to a gif to lower the file size down. Gifmakers (including myself) used to use this as a trick to get the file size down under 3mb. However, since the .gifv update on Tumblr, any gifs with Lossy added will look distorted like it’s a gif made on a phone app or something.
_________________________________
That’s it for this guide! Again, feel free to check out my other tutorials on photoshop, how to center subtitles, download hq movie trailers, and more ✌️
UPDATE 6/23/20 ⚠️
I’ve gotten an ask about this problem 3 times since I’ve uploaded this tutorial, so I thought I’d add this in. If you are experiencing duplicate and/or missing frames in mpv, it is a glitch with the latest version of mpv. download an older version like 0.29.0. this happened to me on my mac and downloading an older version fixed the problem.
3K notes
·
View notes